
Creating your own segments
Haben Sie Interesse an den Interessengebieten? Dann klicken Sie hier!
The possibility to create your own custom segments as well as an overview of your already created segments can be found at Settings → Account → Custom Segments:
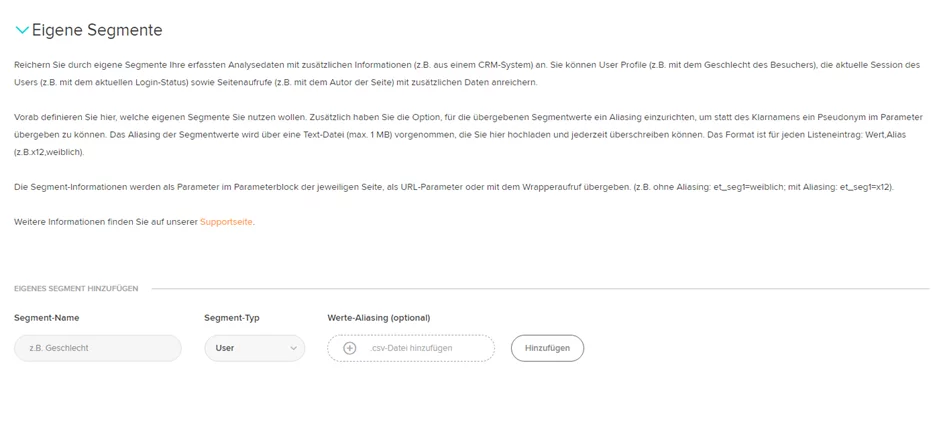
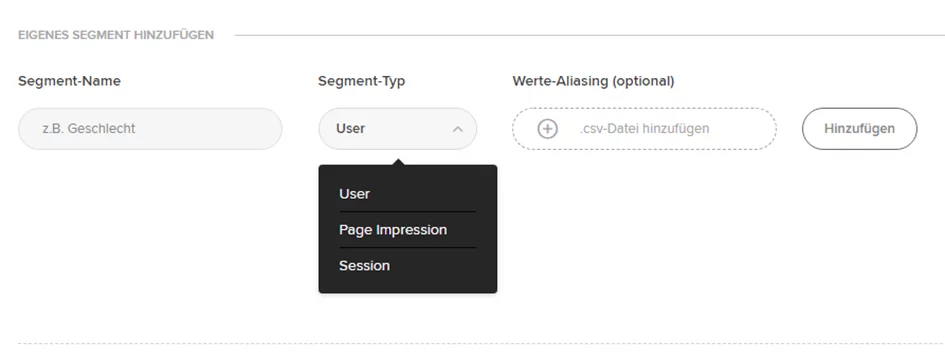
To create a new custom segment, enter the segment name that you want to see later in the reports in the Segment Name field. Then select the User segment type from the drop-down menu.
After filling in the “Segment Name” and “Segment Type” fields, click “Add” to add the segment. After adding your own segment, it will appear in the segment overview. The “Parameter” column displays the parameter (e.g. “et_seg1”) that you can use to pass the segment information.
You can define five custom segments by default. An extension is possible at any time. Please contact your account manager.
Value Aliasing (optional)
You have the option to set up aliasing for the transferred segment values in order to be able to transfer a pseudonym in the parameter instead of the clear name. Aliasing the segment values is done via a CSV file (max. 1 MB) which you upload to your corresponding segment and which you can overwrite at any time.
The format is for each list entry: Value, alias (e.g.. x12, female or “y34”,“male”).

After clicking on +-add .csv file, you can navigate to the value file and download it again.
Caution:
Aliasing only applies when saving the file in the application for all future visits by the respective website visitor, but it does not work retroactively.
Transferring Segment Information
If you have created custom segments under Settings → Data → Custom Segments, you can pass the segment information as a parameter in the parameter block of the respective page as a URL parameter or with a wrapper call.
Example of passing in parameter block with parameter on page call:
var et_seg1="[Wert]";
Example of passing with URL parameter when calling via external link:
http://www.meineseite.de?etcc_cmp=Sommer&etcc_med=Display&et_seg1=[Wert]
Example of passing with the wrapper function:
onmousedown="et_eC_Wrapper({et_et: accountkey1, et_pagename: "Login-Startseite", et_seg1: [Wert]});"
Example
For visitors to your website, additional information should be provided as to whether they are female or male visitors and whether the website was accessed by internal employees or external visitors.
The transfer of information on the gender of visitors should not be in plain text.
Step 1: Creating your own Segments
Two individual segments will be created: “gender” and “author”. For the segment “gender” the values “male” and “female” should be transferred. The segment type “User” is selected, because the user profiles should be enriched. For the segment “Author” the values “Author Mustermann” and “Author Musterfrau” are to be passed. The segment type “Page Impression” is selected because the page should be enriched.

Step 2: Creating Values File
To encode the values for your segment “Gender”, a CSV file with the following content will be created:
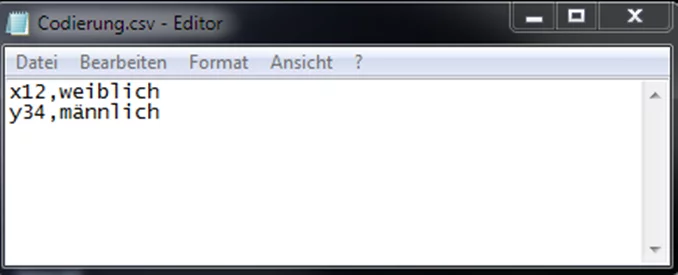
Here, when transferring the values ‘x12’ and ‘y34’, encoding will be done in such a way that these values are then tracked as segment values ‘female’ and ‘male’ and published in the reports.
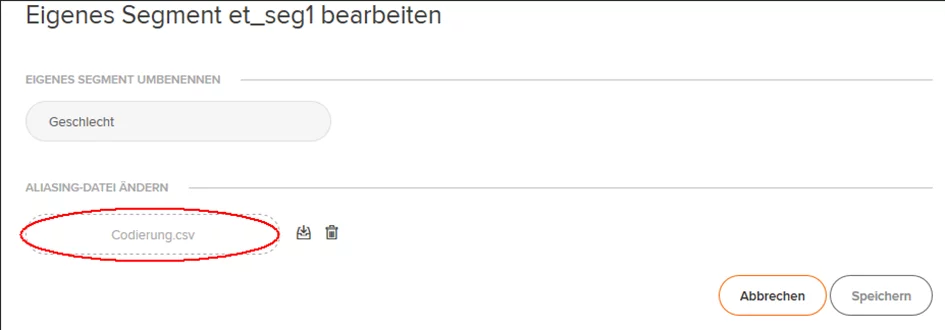
Step 3: Uploading Value File
Upload value file under Settings → Data → Own segments to the segment “Gender”.
Step 4: Integration of the parameters for transfer as segment information
When your web page is called by an internal employee, the passing of the parameters in the parameter block of the Signalize code then looks like this:
var et_seg1 = "x12";
var et_seg2="intern";